The Agency Content Workflow: From Client Brief to Delivered Asset in 14 Steps
Learn how to build a clear agency content workflow, from client brief to final delivery. Follow 14 simple steps to reduce revisions, improve client feedback, and make content production easier for your agency team.

The deadline is in three days. The client is waiting. The designer is asking where the copy is. The copywriter is waiting for feedback from the account manager. The account manager is traveling.
This is what content production can look like when there is no clear process, and this is how agencies lose time, money, and nerves. Not because their team is doing bad work, but because they do not have a system.
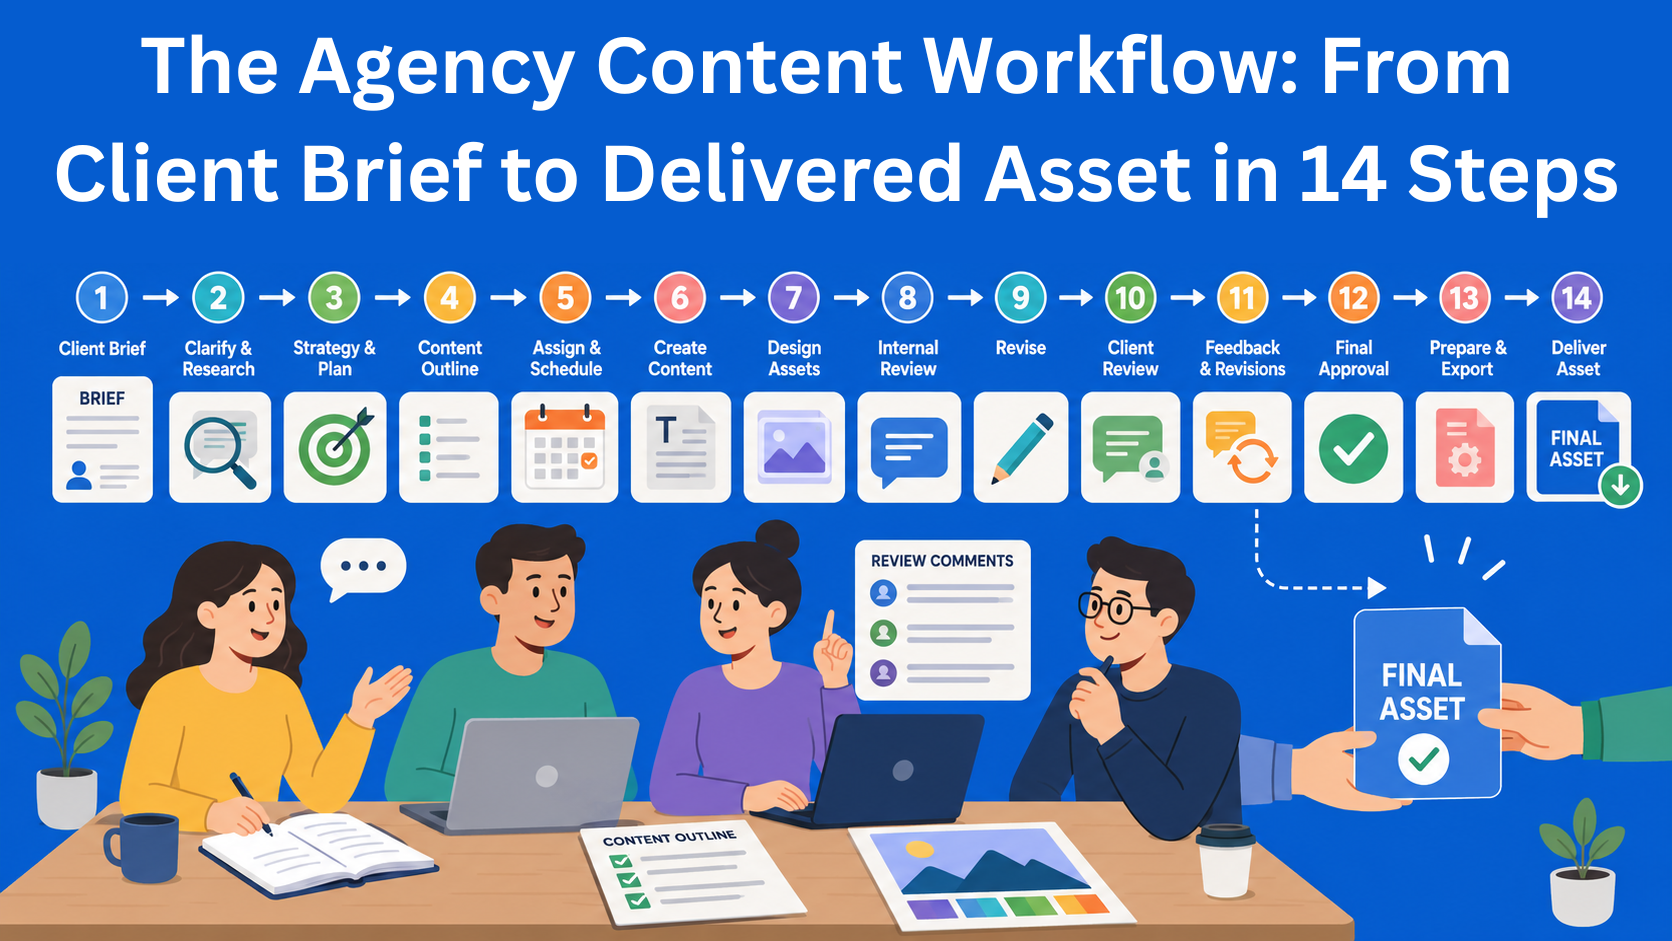
But it does not always have to be like that, because there is a repeatable content workflow that guides your process from the first conversation with the client to the final delivered asset. And in the rest of this article, you will see 14 steps that show what the content process of an agency should look like.
Key Takeaways
- A structured workflow turns chaotic projects into predictable processes - clear steps from brief to delivery reduce delays and confusion.
- Understanding the brief and aligning with the client early saves time - kickoff calls and clear goals prevent unnecessary revisions later.
- Planning and structure are essential before writing begins - outlines and internal approvals ensure the team works in the right direction.
- Defined production and review steps improve quality - separating drafting, editing, design, and feedback creates better content.
- Clear approval and delivery processes build client trust - structured revisions, final sign-off, and organized delivery leave a strong professional impression.
Part 1: Understanding the Brief
Step 1 - Intake & Brief Review
Everything starts with the brief. But do not start writing right away. First, read the brief carefully and check if everything is clear. Do not look at it as a simple task list, but as the foundation that should show you what the client really wants.
What are you looking for? First of all: what the client actually wants to achieve with this content, not just what is written on paper. Also check whether there are parts of the brief that are not clear enough and that different people could interpret in different ways. Because if it is not clear to you, it will very likely not be clear to the person who needs to write it either.
Create a habit of writing down three things after every brief review:
- the content goal,
- the target audience, and
- one potential problem you see in the brief.
This will save you hours of work later.
Step 2 - Stakeholder Kickoff Call
Even when the client says, “The brief is complete, there is no need for a call”, always schedule that call.
Why? Because what people write in a document and what they actually mean are often not the same thing. On a kickoff call, you get the details that are hard to capture in writing:
- the tone of voice they want,
- the things they definitely do not want,
- previous examples they liked or did not like.
This is a key part of the content strategy process that gets skipped more often than it should. Five minutes of conversation can save you two rounds of revisions.
Ask them: Who is the ideal reader of this piece? What should they do after reading it? Is there anything you tried before that did not work?
Step 3 - Defining the Content Goal
Every piece of content has one primary goal, not two, three, or four.
Is the goal for the reader to click a link? Fill out a form? Build trust in the brand? Learn something specific? If this is not clearly defined, the team will not know which direction to follow.
Write that goal in one sentence and check whether everyone on the project gives the same answer when you ask them individually. If the answers are not the same, it means something is unclear and needs to be solved before you start production.
Part 2: Strategy and Planning
Step 4 - Audience & Channel Mapping
Who is reading this content? And where are they reading it?
This sounds basic, but it is surprising how many agencies skip this step and write content “for everyone”, which, in practice, means for no one.
A blog post read by a 35-year-old marketing manager between meetings needs to be structured differently from a LinkedIn post that same manager scrolls through on their phone in an elevator.
The channel where the content is published always directly affects how the text will look, how long it will be, what format it will have, and what writing style should be used.
Step 5 - Content Framework & Structure
An outline is not optional. It is not just a “nice practice” either. It is the foundation you need before writing can begin.
A good framework shows how the text should flow: where it starts, in what order the ideas are explained, and how it ends. When this does not exist, the writer has to guess what to do, and that usually means more changes and more revisions later.
The outline should be detailed enough that anyone on the team can read it and understand what the final text needs to achieve. If the outline is unclear, the text will be unclear too.
Step 6 - Internal Alignment & Sign-Off on Direction
Before the writer starts writing, someone on the team should confirm that the direction is right.
Agencies often skip this step because “there is no time”, and this is exactly where mistakes usually happen that later take much more time to fix. Why? Because it is much easier to change an outline than a finished text.
Who should approve it? The account manager, the creative director, and sometimes the client if the project is bigger. The important thing is that there is written confirmation somewhere that everyone agreed on the direction before content production begins.
Part 3: Production
Step 7 - Research & Source Gathering
How do you know that you have researched the topic enough? When you start getting the same information from several different sources, that is a good sign that you have enough material to work with.
Content research is not just Googling the topic. It means checking whether the information is accurate, finding specific examples, and, if the topic is more specialized, talking to people who understand it better. It is also important to record your sources, because the client may often ask: “Where did this information come from?”
Step 8 - First Draft Creation
There is one first-draft rule that changes everything: write quickly and do not edit as you go.
Do not try to write and edit the text at the same time. When you keep stopping to fix every sentence, you only slow down the writing process. That is why it is better to write the full draft first, and then come back later to clean up the parts that do not sound good.
The first draft does not have to be perfect. What matters is that there is a first version of the text that the team can review, edit, and improve.
Step 9 - Internal Editing Round
Internal editing should happen in two steps: first, check whether the text has a good structure, and only after that fix the sentences, style, and mistakes.
Structural editing should check:
- Does the text have a logical flow?
- Does every section support the goal?
- Is the introduction strong enough to keep the reader’s attention?
Content editing at this stage can mean moving, shortening, or completely removing certain paragraphs.
Only when the structure is solid should copy editing come next, grammar, style issues, and tone of voice. These two steps should not be done by the same person at the same time.
Step 10 - Design & Asset Production
When the copywriter finishes, the work moves to the designer. But this handoff should not be “here is the text, make something nice.”
The designer should receive:
- The final text,
- Information about the format and dimensions the asset needs to be created in,
- An example of how the visuals should look and the deadline for when they need to be finished.
A short design brief inside the project is not something you should see as an extra complication in the process. It is a way to help the designer immediately understand what needs to be done, without wasting time guessing.
This is also where you agree on which additional visuals should go with the text, such as infographics, photos, illustrations, or a video thumbnail if one is needed.
Part 4: Revisions and Approval
Step 11 - Client Review Round 1
When you send content to the client, do not just send the file without any explanation. Add a short message explaining why the content was created in that way, what the client should pay special attention to, and which questions you want them to answer.
Why? Without that, you will often get a comment like: “I do not like it.” And that kind of feedback does not help much, because you do not know what exactly needs to be changed. A good client feedback process means the client clearly explains what does not work for them and why, instead of only saying that something is not good.
Step 12 - Revisions & Iteration
Changes are a normal part of every project. But there needs to be a clear limit.
If you do not say at the beginning how many rounds of revisions are included in the project, the client may think they can ask for changes as many times as they want. For most content production projects, two to three rounds of revisions are more than enough. That is why this should be clearly written in the contract or brief from day one.
Scope creep during revisions, adding new requests that were not part of the original brief, should be handled calmly and directly: “This is a new item outside the agreed scope, and I can send you a separate quote for it.”
Step 13 - Final Approval
When the client approves the asset, that approval should be recorded somewhere. It can be an email, a message, or a comment in the document. It does not matter where, as long as there is proof that the asset was approved.
Before you close the file, check one more time:
- Is the final version labeled correctly?
- Is it archived in the agreed place?
- Does it include all the elements the client requested?
This step prevents the client from coming back a week later and saying they thought you had agreed on something else. And to make this easier, there are tools like EasyContent, where you can create your own workflow and define steps (for example: brief, review, approved, completed). You can also assign roles to team members, create a template for any type of content you are working on, create a brief, communicate with team members inside the platform in real time, and use many other options.
Part 5: Delivery
Step 14 - Delivery & Handoff
The final step is handing over the finished asset. Even though it seems simple, this part often leaves the strongest impression on the client.
A good content delivery process means sending the client everything they need, clearly and neatly.
That includes:
- Files in the agreed format,
- Clearly named documents,
- A short note explaining how the asset should be used, if needed.
If you are delivering web content, also include the meta description, alt text for images, and a note about the keywords if SEO optimization was done.
When the client receives everything ready to use, without needing to ask extra questions or look for files, it leaves a good impression. It shows that the agency is organized and pays attention to detail.
Conclusion
This workflow does not always have to look the same. You can adapt it to the size of your team, the type of project, and the way the client likes to work. Sometimes you will combine several steps into one conversation. Sometimes you will skip a step, especially if the client already has a lot of trust in your team.
But one thing should stay the same: content is always better when there is a clear process. Then there are fewer changes, fewer misunderstandings, and fewer last-minute messages.
Your team and your client will feel that from the very first project.